Saturday, August 29, 2015

Screencasts for your class

If you are like me, you have always known the power of video for learning. Yes, I use Youtube to learn how to do something. Don't you? So I knew there was an opportunity to help students learn through videos in my classroom, but I had no idea where to start. Then I heard about screencasts. The program captures what is on your screen (powerpoint, visual, handout) and then records audio alongside.  Since I love trying new things, I gave it a shot. Though I am not a huge fan of hearing my voice on video, it was actually easy and fast. In fact, I think anyone can do it, even your students (primary too). There are many programs, but there are two that I have used and would definitely recommend. My two favorites are  Screencast-o-Matic and Screencastify. So below I give the pros and cons to each. 
Pros

  • Online website
  • Download the recorder directly to your desktop or use the website
  • Video recorder is simple and intuitive to use.
  • You do not need a camera
  • Offers 3 choices in uploads
    • YouTube Channel
    • Save video file to your computer
    • On your screencast-o-Matic account
  • Free account
    • 15 minutes recording time
Cons
  • Free account comes with limited options
    • 15 minutes recording time  (must pay to upgrade account to have longer videos)
  • Does not work on a Chromebook
  • Does not save to Google Drive


Pros


  • Chrome App and extension
  • Works on Chromebooks
  • Video recorder is simple and intuitive to use
  • Allows for easy editing and cropping
  • Offers three choices in uploads
    • YouTube Channel
    • Google Drive
    • Save it as a WebM file to your computer
  • Free account
    • 10 minutes recording time
Cons
  • Free account comes with limited options
    • 10 minutes recording time (must pay to have longer videos)
    • Screencastify logo is on the video
  • Must use Chrome

Sunday, July 26, 2015

Back to School with Google Classroom


It’s starting to pop up everywhere. Commercials are buzzing about it, stores are displaying it, and Twitter folks are beginning to tweet about it.  Back to School!


Yes! I will miss the lazy summer days, but there is also something exciting about the start of a fresh new year.  An opportunity to try a new strategy, program, or book. This year I am very excited to try Google Classroom.  


I learned about Google Classroom last year when I started my Twitter account. My curiosity was peaked. I am a fan of many Google Apps, and I use Google Drive for nearly all my work. However, I was not sure I would need it because our school uses the LMS Moodle.  Moodle has been an excellent way to organize my curriculum, create tests, post assignments, and so much more.  


Yet one area that has been a challenge is how to clearly assign and collect electronic assignments. This is where I think Google Classroom can help. Google Classroom allows me to quick add assignments for students, view who has turned it in, and easily find, grade, and return the assignments to students with feedback.  


I am sure there will be a learning curve for myself and my students. Fortunately, there are experts out there to help. Alice Keeler’s has a wealth of resources on her website Teacher Tech.


Here are some of her blog posts that I will use to prepare myself and students for Google Classroom:


So whether we are ready or not it’s back to school! What are you going to try this year?

Sunday, July 19, 2015

Start Developing Your Own Personal Learning Network (PLN)

Where I started

I am not an expert, in fact, I am new to the online world of connected educators.  What I can tell you is that in the three short months from when I began my journey, becoming a connected educator has transformed me, and I will never go back. 
Before becoming a connected educator, trying  to find a new resource, app, or tool was like searching for a needle in a haystack. Honestly, I usually started with a Google search. Consequently, I would spend hours filtering, curating, and trying out sites or lesson plans.  Though I found a few gems along the way, it was tedious and time-consuming.  
Have you been there? I have found a better way. Start developing a personal learning network (PLN). 
Get Connected with Twitter

Try Twitter. No seriously, try it. I was terrified, so I went to a friend who had a Twitter account to help me get started. I love it when there is someone who can help. So if you have a friend who uses Twitter ask him or her to walk you through it.

Also, I highly recommend Alice Keeler’s Blogpost, “Twitter for Educators -A Document.” It explains the importance of Twitter for educators, tips for how to use it, and even how to set it up. 

Learn from the best blogs

There are incredible educational websites and blogs that support educators. One great place to start looking for blogs to follow is Teach 100.  This site ranks the top 100 educational blogs. Commit to reading a few at a time and follow the blogs that make sense for you. Your favorites may not be in the top 10, so keep trying. 
Three  of my favorites:
Get to know other connected educators
I had the privilege of recently interviewing Jackie Smith, a connected educator from Fresno, CA. She is a presenter for the San Joaquin Valley Writing Project, an English teacher for University High School, and is a Certified Graphite Educator.
Chatting with Jackie about education inspired me to step out of my comfort zone as an educator. Jackie is passionate about sharing. Sharing about her students, about writing, and about education. Here is our interview via Google Chat below:

Follow her on Twitter @Jaclynsmith345, and check out the Yosemite Conference by California Association of Teachers of English that she is planning in beautiful Yosemite, CA.
All the advice, from the experts and myself can be boiled down to this: 
  • Jump in!
  • Get started!

If I can do it, then so can you. 
What are your favorite tips for growing your PLN?

Sunday, July 12, 2015

How connected should our kids be? by Kristy Rubenstein

Jen, thank you for letting me contribute to your blog.  


This morning I looked over at my kids and two out of three of them were on electronic devices.  Now this wouldn’t be abnormal for my 5 and 7 year old if they had free time on the weekend.  The odd part was that my two older kids, as well as children of my friends, were all sitting in their family room independently “playing together.”  The kids were playing Minecraft.  Two of them were on tablets, the other two on an xBox.  Of course, they were all being quiet, but were they really playing together?


This seems to be the new normal.  My kids would rather interact with technology than their peers.  I try to limit the time my kids play on electronic devices and I would rather that they interact with their peers when they have friends over or we are visiting others.  How much time is too much time for a child to be engaged in electronic activities?


How old should a child be before they are allowed to use electronic devices?  


My two year old is currently limited to pushing on the on/off button on my phone.  Would she like to be more engaged with technology?  Absolutely.  But how connected is too connected for a toddler?


We expect our students to be digital natives.  We expect them to be proficient in the use of technology and able to successfully navigate through a digital world with the skills of moral digital citizens.  How best can we best prepare our own children to be successful in these digital classroom environments?  How connected is too connected?

Thanks Kristy for contributing to my blog today! These are questions I know that many parents struggle with including me. I think an open dialogue is important! Are you inspired? Read more about the challenges and strategies for success on Kristy's blog Juggling Technology .


photo credit: <a href="http://www.flickr.com/photos/56638362@N05/5637524300">Minecraft - Bedroom</a> via <a href="http://photopin.com">photopin</a> <a href="https://creativecommons.org/licenses/by-sa/2.0/">(license)</a>

photo credit: <a href="http://www.flickr.com/photos/37165469@N00/371927271">img_7336</a> via <a href="http://photopin.com">photopin</a> <a href="https://creativecommons.org/licenses/by/2.0/">(license)</a>

Thursday, July 9, 2015

Strong Leaders Have Strong Relationships

Leadership is complex.  Not only is it difficult to define, but it is also challenging to boil down to one or two aspects. 

However, two powerful traits of a leader are the ability to see the vision for change. Then be able to  rally those around them to change to fulfill the vision.  
A leader will make a greater change if the situation or environment is open to new ideas and concepts.  Yet, a leader may need more time to create change if the environment is closed off and negative.  Patience is important when trying to create change.   
The key in any leadership situation is to create the openness to change.  This is best accomplished in the area of relationship.  Relationship is essential to seeing the vision realized.    After working for a variety of schools and school districts, I am convinced of the importance the relationship to create lasting and positive change.
So how can we create more change in the area of technology in schools? Lead. Lead by example. Lead by sharing.  Lead by caring about the relationships around you.
What do you think makes a strong leader in education? 

Sunday, July 5, 2015

Teach Students to Deconstruct a Question


One essential skill students need to be successful is to deconstruct a question or set of questions to ensure they answer it completely, thoroughly, and accurate. I am sure, like me, there have been moments when you reading students responses to a question and wondered if they even read the question.  I have also seen responses where the student only read the first question and completely ignored the rest.  If that is you, here are a few simple steps to teach students to read and analyze the entire question.  Also this ties in with the Common Core Standards for Readiness which include that students can read closely to determine what a text says explicitly and make inferences about the text.  

Steps to Deconstruct a Question:


  1. Read the whole question(s) through one time.


Question: What is the central idea of the text? Support your evidence with details from the text.


  1. Now, highlight the verb(s) to see what action or skill you need to perform.  
    1. Examples: identify, analyze, explain, describe. This would also be a great time to review Bloom’s Taxonomy with your students.   


Question: What is the central idea of the text? Support your evidence with details from the text.


3. Next underline the “what” in the question.


Question: What is the central idea of the text? Support your evidence with details from the text.


4. Finally, identify the “where” in the question. If you are deconstructing the question online I recommend italics, but if you are using paper I would circle. Example: in the text, from the paragraph, from your experience


Question: What is the central idea of the text? Support your evidence with details from the text.


5. Now the question can easily be broken down and paraphrased. This step is essential because if you cannot paraphrase what the question is asking then the meaning may still not be clear.   


Paraphase: To clearly answer this question, I must identify the central idea and identify and use examples to support my central idea.


*Important Disclaimer:  This question has a significant amount of academic vocabulary, and the vocabulary may need to be pre taught in order for students to understand the question regardless of the steps or strategies used above.  


This may be a little tedious, but it is an important strategy that will help when understanding the question is essential.  Here are some examples:
  • Quiz or Test
  • State Testing or Testing Prep
  • Beginning of the year, to develop strong question understanding and how to respond.


Quick Writes Using Google Forms

It is essential for students to be able to process and think about their learning. I have found no better way to have students process their thinking then to give a quick write.  


A quick write can fulfill many different purposes:
  • a quick formative assessment
  • a moment for students to process information
  • an opportunity to write without the worry of a formal editing process.


I recognize that quick writes are not new. However, I have struggled to find a simple and easy way to have students do digital quick writes, either on their computer (if your school is 1-to-1) or on their personal devices.


One way to make it truly quick to write and quick to view, or assess is with a Google Form. Using a Google Form makes it simple for the students to view the questions and respond.  Once the students have submitted their responses they will show up in a Google Sheet.  I can then simply review the responses to check for understanding. Here is how I set up a Google Form for a quick write.


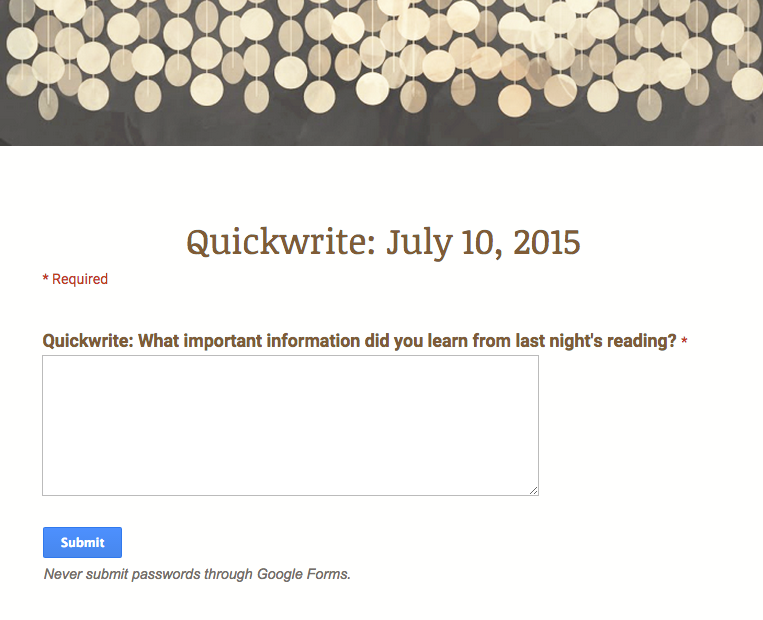
I like to put the word quick write in the title.  This informs the students and me that it is not a formal writing paragraph or assignment.  If you do regular quick writes, adding the date in the title may be helpful to organize it.  


Screen Shot 2015-07-05 at 2.47.23 PM.png


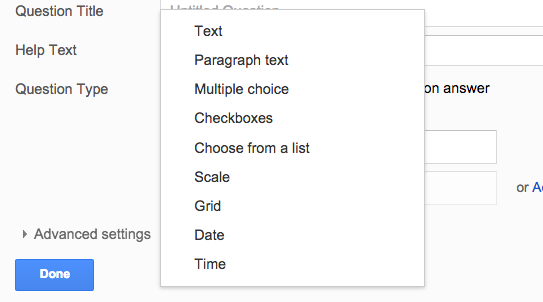
Next, just type in the question for your quick write, and add the question type as paragraph text.

Screen Shot 2015-07-05 at 2.49.52 PM.png


If you want to make it fancy change the theme, and your quick write is ready!

Screen Shot 2015-07-05 at 2.58.55 PM.png

Finally get the link to your students in one of the following ways.
  • Email it
  • Post it on your webpage, Moodle page, or other class site
  • Google Classroom


 After the students submit their quick writes, you will see all the responses in one Google Sheet.  Then you can quickly read and/or assess the students’ responses.

Quick writes are a powerful writing and thinking tools, and I hope you will try it with a Google Form!